ऑर्डर लेना
Order screen खोलने के लिए होम मेनू पर ऑर्डर लें टैप करें।
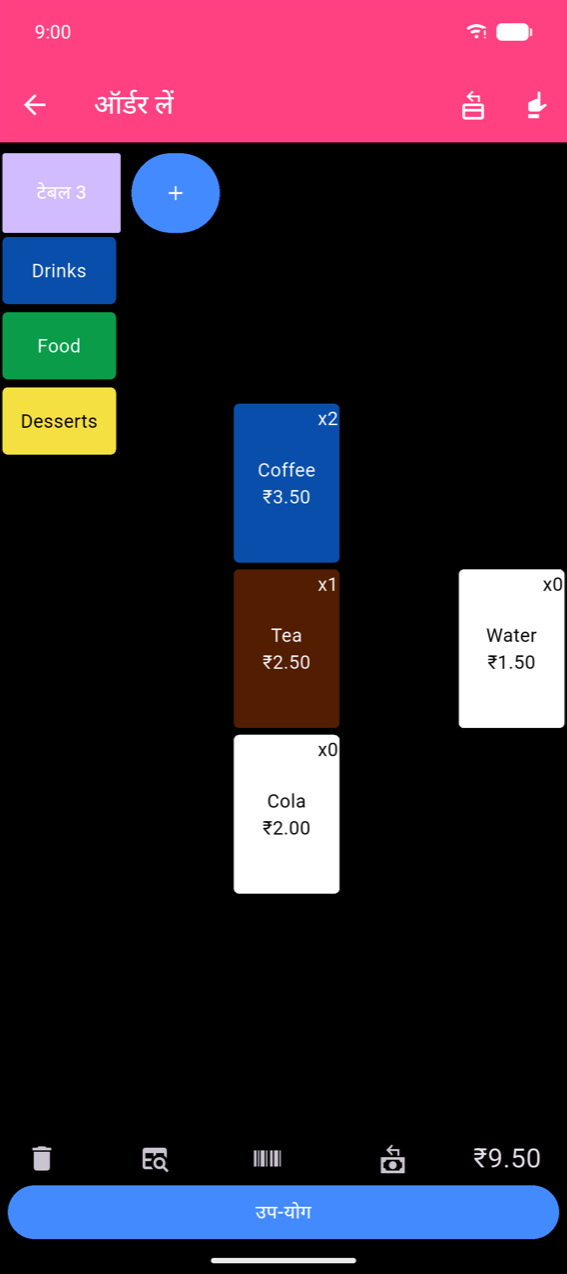
ऑर्डर लें screen
Category buttons बाईं तरफ run करते हैं। Category टैप करने पर दाईं तरफ product grid switch होता है। Bottom bar एक running total और उप-योग button दिखाता है।
Note
ऑर्डर लें और checkout screens पर prices आपके device के locale setting से format होती हैं। Product-management screens (बटन संपादित करें, उत्पाद संपादित करें) में prices सेटिंग्स → Currency में configured currency use करती हैं। इनमें अलग-अलग symbols या decimal formats दिखना normal है — यह design के अनुसार है।
Products जोड़ना
- एक unit तुरंत जोड़ने के लिए product button टैप करें। हर टैप से button का badge increment होता है।
- Order में पहले से मौजूद product को Long-press करने पर उसकी current quantity pre-filled product sheet खुलती है — quantity या options change करने के लिए use करें, या quantity 0 करके remove करें।
- Weight-priced products (जिन पर वज़न इनपुट समर्थित करें enabled है) जोड़ने से पहले Enter weight numpad खोलते हैं। तीन decimal places तक दर्ज करें और Ok टैप करें।
Options चुनना और quantity adjust करना
Options वाले product को टैप करने पर तुरंत add होने की बजाय product sheet खुलती है।
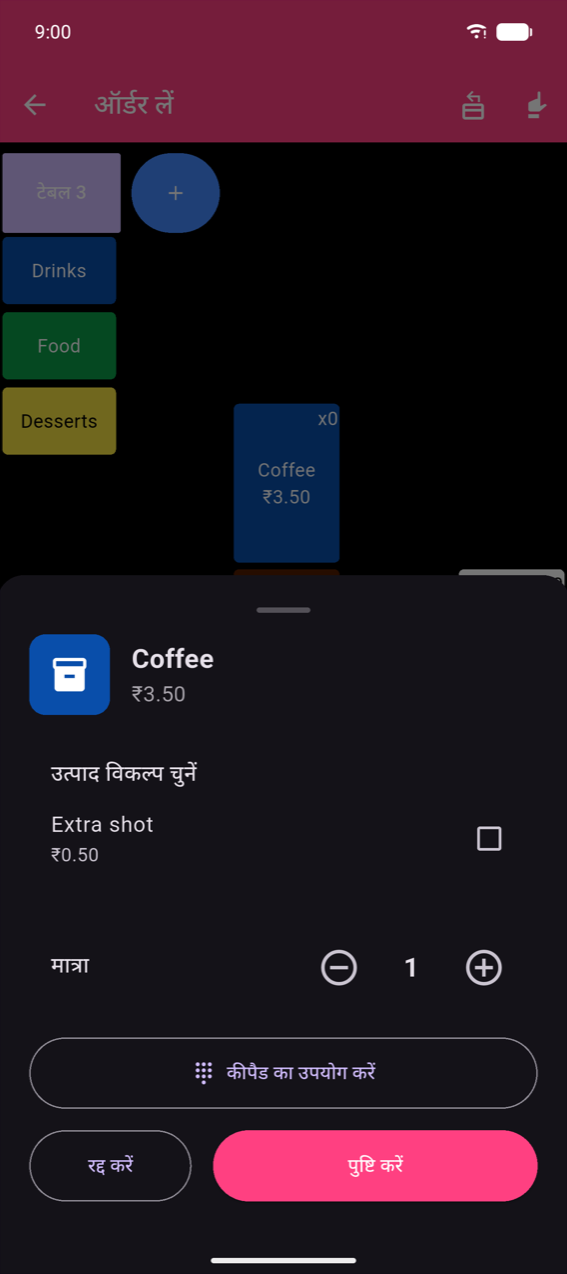
- जो options चाहिए वे check करें, फिर − / + stepper से Quantity adjust करें।
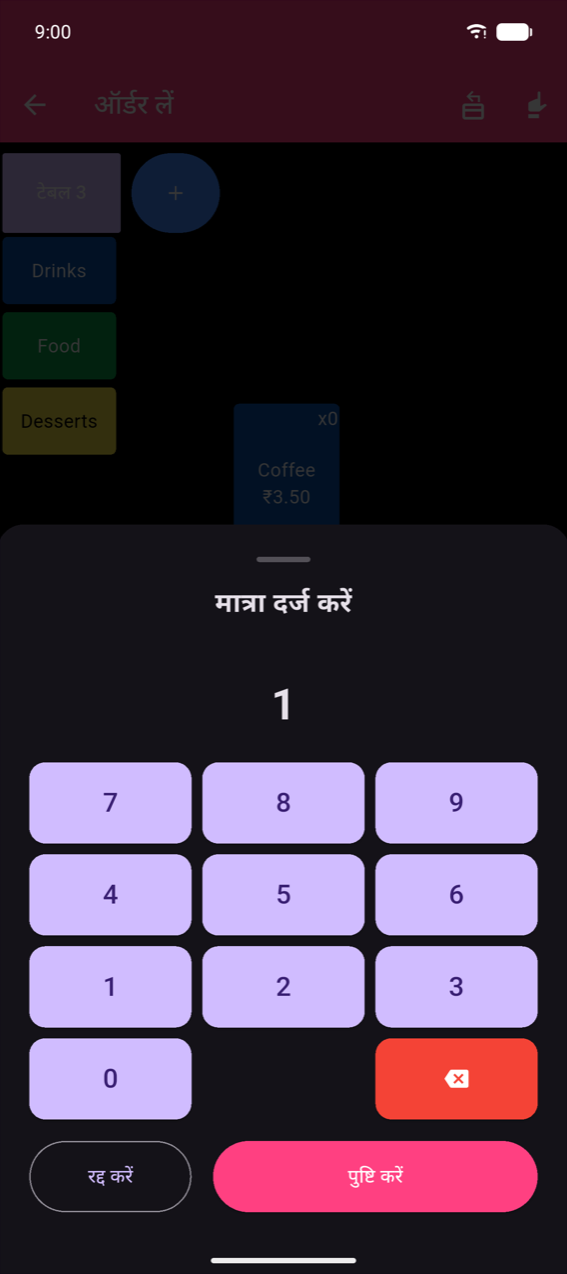
- Large quantities के लिए, number directly दर्ज करने के लिए Use keypad टैप करें।
- Quantity 0 करने पर order से product remove हो जाता है।
- Apply करने के लिए Confirm टैप करें; बिना changes dismiss करने के लिए Cancel।
Multiple orders और tables
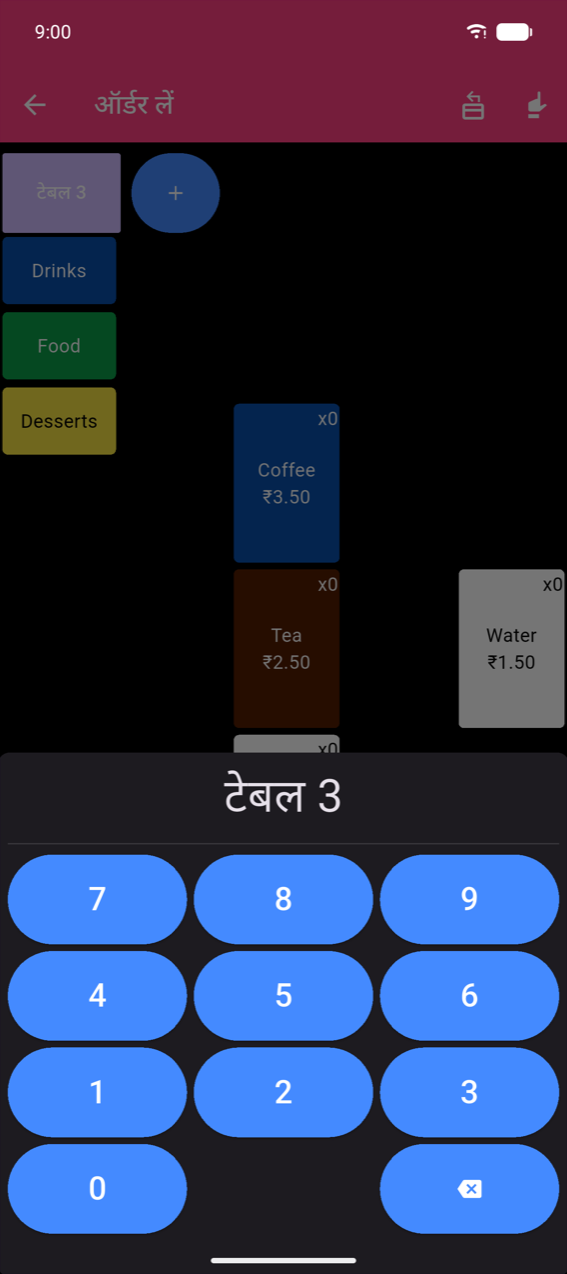
Default में screen एक single persistent order hold करती है। Top पर order/table buttons की strip दिखाने के लिए सेटिंग्स () में एकाधिक ऑर्डर enable करें।
नया order खोलने और table number दर्ज करने के लिए strip में + टैप करें।
Note
यदि एकाधिक ऑर्डर के साथ Settings में मुक्त इनपुट भी enabled है, तो + keypad free-text field से replace हो जाता है — numbers की जगह customer names या labels दर्ज करने के लिए useful।
फ़्लोर प्लान table picker
जब Settings () में फ़्लोर प्लान भी enabled हो, तो + button एक dedicated Select a table button से replace हो जाता है जो directly visual table picker खोलता है।
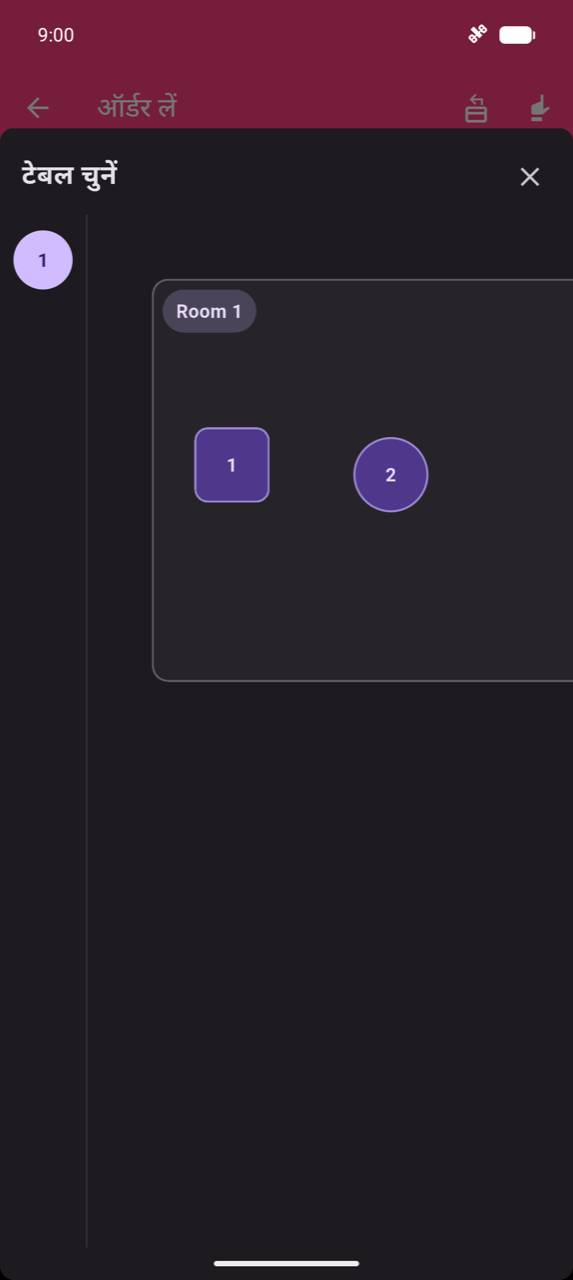
Sidebar में floor select करें, फिर canvas पर table टैप करें। सेटिंग्स → फ़्लोर प्लान संपादित करें में floor plan build और edit करें — देखें सेटिंग्स।
Note
यदि अभी तक कोई floor plan नहीं बना है, तो picker "No floor plan configured yet. Set it up in Settings > Edit floor plan." दिखाता है।
Barcodes scan करना
Camera scan — full-screen scanner खोलने के लिए bottom bar में barcode icon () टैप करें (scanner screen Products & categories में दिखाई से identical दिखती है)। Torch और camera-flip controls overlays के रूप में दिखते हैं; इस screen पर कोई text labels नहीं हैं। Product barcode पर camera point करें:
- Known barcode — product sheet खोलता है।
- Unknown barcode — "The barcode you scanned is unknown." दिखाता है। Barcode को existing product से attach करने के लिए उत्पाद से लिंक करें टैप करें, या dismiss करने के लिए Ignore।
Continuous scan session — एक persistent scanning mode जहाँ camera खुला रहता है और हर scan तुरंत order में add होता है। Last scanned card ± correction के साथ most recent product दिखाता है; Scanned this session list सब कुछ track करती है। Session बंद करके order पर वापस जाने के लिए हरे हो गया button टैप करें। Unknown barcodes same उत्पाद से लिंक करें / Ignore options के साथ orange card दिखाते हैं।
Hardware scanner (keyboard-wedge) — keyboard के रूप में connected Bluetooth या USB barcode scanner से scan करता है। हर scan एक unit add करता है और top के पास एक brief green overlay दिखाता है "{Product} added" item count के साथ। Overlay auto-dismiss (~2 s) होने से पहले टैप करें तो scanned quantity pre-filled product sheet खुलती है।
Products search करना
Product search खोलने के लिए bottom bar में search icon टैप करें। Type करना शुरू करें — type करते ही results update होते हैं। Product sheet खोलने के लिए result टैप करें।
Checkout overview
Order empty होने पर disabled उप-योग टैप करें तो order summary खुलती है।
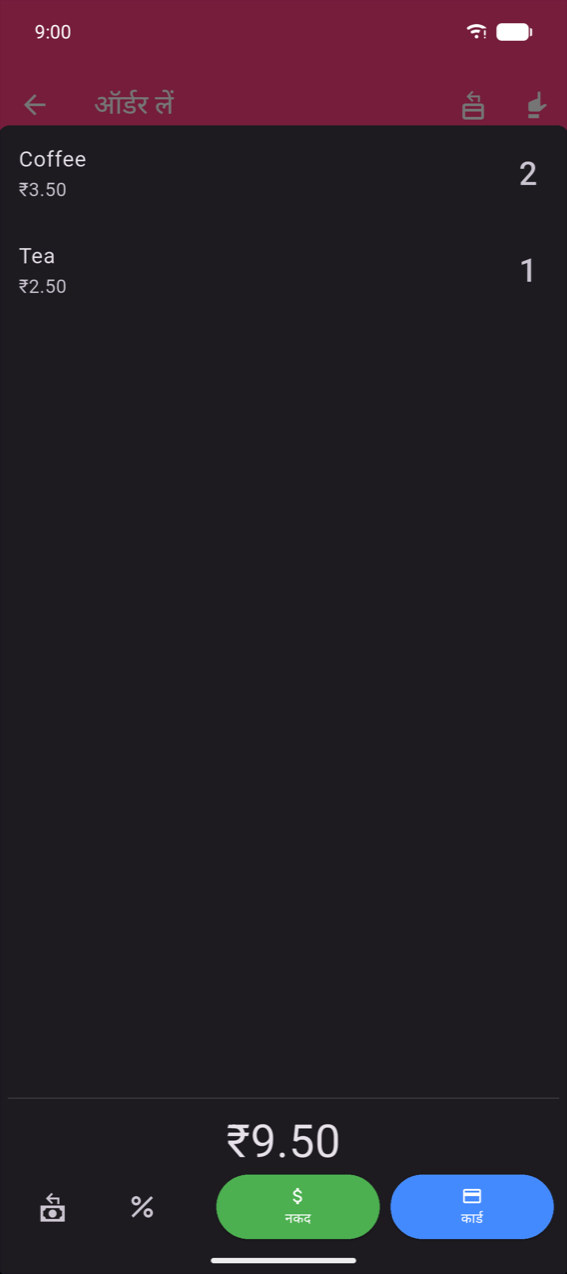
Remove one और Remove all reveal करने के लिए कोई भी line left swipe करें। Payment method buttons और बाकी checkout flow भुगतान में covered हैं।
Refund mode
जब Settings में रिफंड मोड बटन enabled हो (यह default से on है), तो Take order app bar में एक icon refund mode toggle करता है। Mode active होने की confirm के लिए पूरा background dark red हो जाता है।
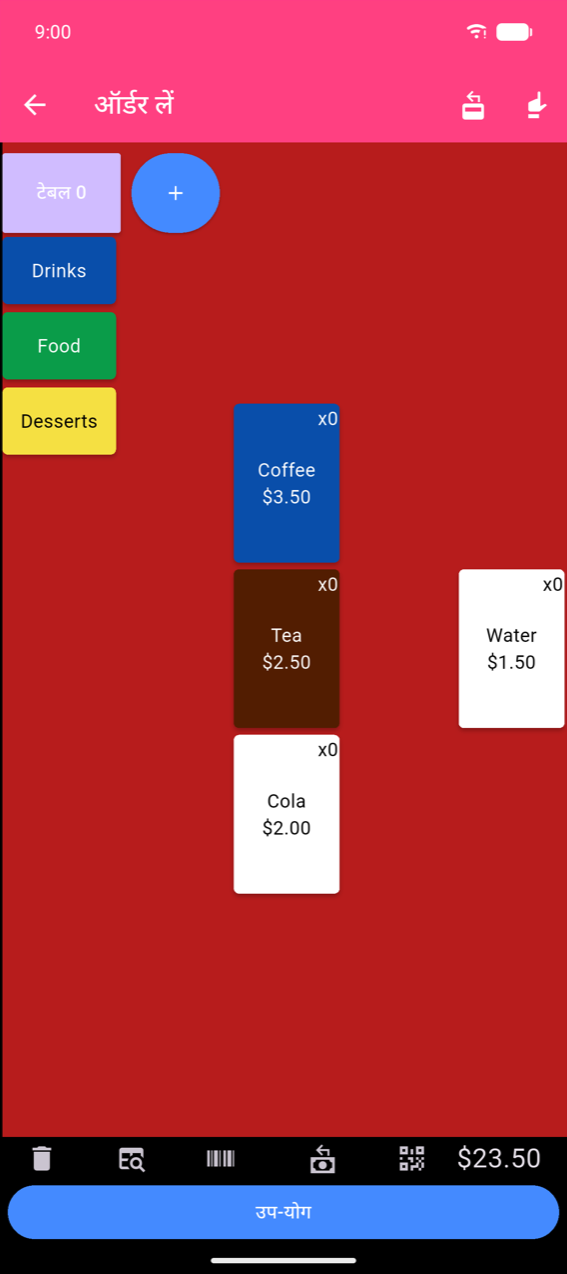
Refund mode में, products tap करने से quantities घटती हैं। Order normally complete करें; completed order Order history में red रिफंड badge के साथ marked होता है।
Refund mode से बाहर निकलने के लिए same icon फिर से टैप करें।